When you’re working in Photoshop, there are a lot of different ways to create custom brushes. One way is to import them from other software programs like Clip Studio Paint. Here’s how to do it:
First, open the brush panel in Photoshop (Window > Brush). Then, click on the menu icon in the top right corner of the panel and select “Import Brushes”. This will open a new window where you can browse for the brushes you want to import.
- Open Photoshop and go to the “Edit” menu
- Select “Presets > Preset Manager
- In the Preset Manager window, select the brushes you want to import and click “Export
- Save the exported file to your computer
- Launch Clip Studio Paint and open the “Tool” menu
- Select “Customize Tools > Import Photoshop Brushes
- Locate and select the file you exported from Photoshop, then click “Open
Convert Clip Studio Paint Brushes to Abr
Clip Studio Paint is a great program for digital painting, but it can be even better with the right brushes. If you’re looking to convert your Clip Studio Paint brushes to Abr format, here’s how to do it.
First, open up the Brush Settings menu in Clip Studio Paint.
Next, click on the “Export” button at the bottom of the menu. In the Export dialog box that appears, make sure that the “Save as type” drop-down menu is set to “Adobe Photoshop Brushes (.abr)”. Now give your brush file a name and choose a location to save it, then click “Save”.
That’s all there is to it! Your Clip Studio Paint brushes are now ready to use in Adobe Photoshop.
Photoshop Brushes Like Clip Studio Paint
If you’re a digital artist, then you know that having a good set of Photoshop brushes is essential. But what if you’re looking for something a little different? Something with more features and options?
That’s where Clip Studio Paint comes in.
Clip Studio Paint is a digital painting program that has everything you need to create amazing artwork. It comes with a wide variety of brushes, which can be customized to suit your needs.
And best of all, it’s compatible with Photoshop! So if you’re looking for an alternative to Photoshop, give Clip Studio Paint a try.
How to Import Multiple Brushes into Clip Studio Paint
If you’re like me and you love to find new brushes to use in Clip Studio Paint, then you know how annoying it is to have to import them one at a time. Well, I’m here to tell you that there is a way to import multiple brushes into Clip Studio Paint at once, and it’s actually quite easy!
First, open up the folder where your brushes are stored.Select all of the brushes that you want to import (you can do this by holding down the Shift key and clicking on each brush). Then, right-click on any of the selected brushes and choose “Copy.” Next, open Clip Studio Paint and go to Edit > Preferences.
In the preferences window, click on the “Brushes” tab. At the bottom of this tab, there is an option that says “Enable Multiple Selection for Importing.” Make sure this box is checked.
Now go back to your folder of brushes. Right-click anywhere inside the folder and choose “Paste.” This will bring up a window where you can select which brush category you want to import your new brushes into.
Choose whichever category makes sense for your project, or create a new category if needed. Finally, click “OK” and thosebrushies will be imported into Clip Studio Paint!
Abr File Clip Studio
An Abr file is a Photoshop brush file used by Adobe Photoshop and other graphics editing programs. Abr files store the attributes of a brush, such as its size, shape, and color. They are typically saved in binary format and can be exported and imported between different graphics programs.
Clip Studio Paint is a graphic design program that allows you to create digital artworks. It offers a wide variety of features and tools to help you create your masterpiece, including the ability to use Abr files. With Clip Studio Paint, you can import an Abr file and use it to paint or draw on your canvas.
You can also export your own custom brushes as Abr files so that you can use them again in future projects.
Tpl File Clip Studio
A TPL file is a template used by Clip Studio Paint, a software program used for creating digital art. The file contains information about the default colors, brushes, and settings for a new project. When starting a new project, you can choose to use one of the provided templates or create your own.
Abr to Sut
Abr to Sut is a two-week intensive course designed to improve your Arabic reading and writing skills. The course is open to students of all levels, from beginners to advanced.
How to Import Brushes into Clip Studio Paint Ipad
iOS: How to Import Brushes into Clip Studio Paint
In this tutorial, we will show you how to import brushes into Clip Studio Paint for iPad. This process is fairly simple and only requires a few steps.Before we get started, you will need to have the following: -iPad with Clip Studio Paint installed -An internet connection (to download the brushes)
-The desired brushes (downloaded from the internet) Now let’s get started! 1. Open up Clip Studio Paint on your iPad.
2. Tap on the menu icon in the top left corner of the screen (it looks like three lines). 3. Scroll down and tap on “Brushes”. 4. Tap on the “+” icon in the top right corner of the screen.
5. A new window will pop up asking you to select a file type – choose “Clip Studio Brush”. 6. Find the brush files that you downloaded earlier and select them. 7. Tap “Open” in the top right corner of the screen.
8. The selected brushes should now be imported into Clip Studio Paint and appear in your brush palette!
How to Transfer Brushes Clip Studio Paint
In this post, we’ll show you how to transfer your brushes from one Clip Studio Paint account to another. Whether you’re moving to a new computer or just want to share your brushes with a friend, this process is quick and easy. Here’s what you need to do:
1) Open the brush library on your old Clip Studio Paint account.
2) Select the brushes that you want to transfer and export them as a .cbr file.
3) Log into your new Clip Studio Paint account and import the .cbr file that you exported in step 2.
Your brushes will now be available on your new account!
Credit: www.clipstudio.net
Can I Import Photoshop Brushes to Clip Studio Paint?
Yes, you can import Photoshop brushes into Clip Studio Paint. Here’s how:
1. Open the brush panel in Clip Studio Paint.
2. Select the “Import” button at the bottom of the panel.
3. Navigate to the location of your Photoshop brushes (usually in C:\Program Files\Adobe\Adobe Photoshop CC\Presets\Brushes).
4. Select the brushes you want to import and click “Open”.
5. Your Photoshop brushes will now be available in Clip Studio Paint!
How Do I Import Brushes into Clip Studio Paint?
If you’re using Clip Studio Paint for the first time, you may be wondering how to import brushes. Here’s a quick guide on how to do it:
1. Download the brush file that you want to use.Make sure it’s in .abr format. 2. In Clip Studio Paint, go to Edit > Preferences > Import/Export and enable the “Allow import of Photoshop brushes” option.
3. Now go to File > Import > Brushes and select the brush file that you downloaded earlier. 4. The brush will now be imported into Clip Studio Paint and can be used like any other brush!
How Do You Import Photoshop Brushes?
If you’re using Photoshop CC, you can import brushes in the following formats: .abr, .png, .
jpg, and .gif. To import a brush file, select “Edit > Presets > Preset Manager” from the main menu.
In the Preset Manager dialog box, click the Load button and navigate to your brush file. Select the file and click Open. The brushes will be loaded into the Brushes panel.
If you’re using an older version of Photoshop, you can only import .abr files. To import a brush file, select “Edit > Presets > Preset Manager” from the main menu.
In the Preset Manager dialog box, click the Load button and navigate to your brush file. Select the file and click Open.
How Do I Export Brushes from Photoshop?
If you’re anything like me, you can’t get enough Photoshop brushes. I’m always on the lookout for new and interesting brushes to add to my collection. Fortunately, Photoshop makes it easy to export brushes so you can share them with other people or use them in other applications.
Here’s how:
1. Open the Brushes panel (Window > Brushes).
2. Select the brush or brushes you want to export.
You can select multiple brushes by Shift-clicking or Ctrl-clicking (Mac: Command-clicking) on them.
3. Click the menu icon in the top right corner of the Brushes panel and choose Export Selected Brushes…
4. In the Export dialog box, choose a location for the exported file and click Save.
That’s all there is to it! Now your brush or brushes are saved as a .abr file that you can share with others or use in another application.
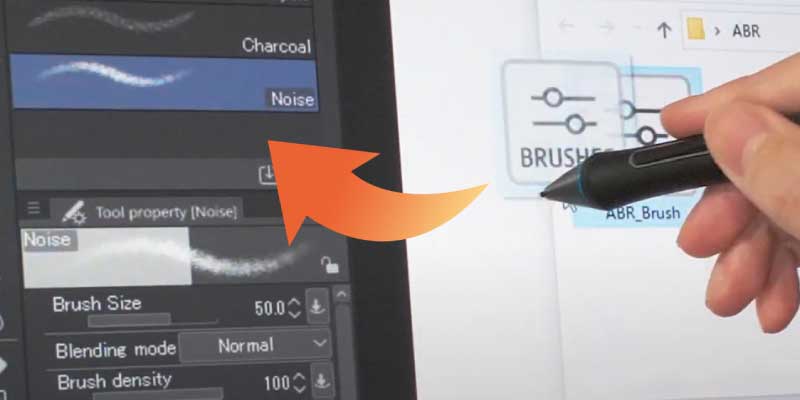
Import Photoshop brushes to Clip Studio Paint Tutorial
Conclusion
Clip Studio Paint is a great tool for creating digital art, but it can be even better with the use of Photoshop brushes. Luckily, importing Photoshop brushes into Clip Studio Paint is a relatively simple process.
First, open the brush panel in Clip Studio Paint and select the “Import” option.
Then, locate the folder where your Photoshop brushes are stored and select the desired brush file. Finally, click “Open” and your Photoshop brush will be imported into Clip Studio Paint!