Spray painting is a fast and efficient way to apply paint to surfaces. However, if you’re not careful, it’s easy to end up with paint drips. Here are a few tips to help you avoid drips when spray painting:
1. Use high-quality equipment. Cheap spray guns tend to produce more paint drips than expensive ones. 2. Thin your paint appropriately.
If your paint is too thick, it will drip; if it’s too thin, it won’t adhere properly to the surface. 3. Practice on scrap pieces of wood or cardboard before starting on your project piece. This will help you get a feel for how much pressure to use and how far away from the surface you should hold the gun.
4. When spraying, start and stop your strokes outside of the area you’re trying to cover.
- Pour your paint into a clean, dry paint bucket
- Place the bucket on a level surface and insert your paint stirrer
- Slowly and evenly mix the paint for about three minutes, taking care not to create any bubbles
- Now it’s time to thin the paint, if necessary
- The general rule is that you should add 10-15% water to latex-based paints and 5-10% for oil-based paints
- Add the water slowly while stirring until you reach the desired consistency
- Once your paint is properly mixed and thinned, it’s time to start painting! Begin by holding the can 6-8 inches away from the surface you’re painting and moving in long, even strokes back and forth across the area
- Keep a light touch with your hand so that only a small amount of paint comes out at a time—you don’t want any drips or runs!
How to Get Rid of Spray Paint Drips
If you’ve ever accidentally gotten spray paint on your hands, clothing, or furniture, you know how difficult it can be to remove. Luckily, there are a few simple methods you can use to get rid of those pesky spray paint drips.
One way to remove spray paint is with rubbing alcohol.
Simply soak a cotton ball in rubbing alcohol and rub it over the affected area. The paint should start to come off immediately. If the area is large or if the paint is particularly stubborn, you may need to use a stiff brush dipped in rubbing alcohol to scrub at the paint.
Another option for removing spray paint is acetone nail polish remover. This method works similarly to using rubbing alcohol – simply saturate a cotton ball with acetone and rub it over the paint until it starts to lift away. You may need to use a little elbow grease (and possibly a brush) for tougher spots.
If neither of these methods seem to be working, you can try using WD-40 or another type of lubricant oil. Spray WD-40 directly onto the painted surface and let it sit for several minutes before wiping away with a clean cloth. This method may take several attempts before all the paint is removed.
Finally, if you’re dealing with small areas of spray paint, you might be able to just scrape the paint away with a razor blade or other sharp object. Be careful not to damage any surrounding surfaces while you’re doing this!
With any luck, one of these methods will help you successfully remove that unwanted spray paint from your life!
Spray Painting Tips for Beginners
Spray painting is a great way to add a pop of color to any project, and it’s actually not as difficult as it may seem. Here are a few tips for getting started:
1. Choose the right paint.
Latex or acrylic paint is best for most projects, but you’ll need oil-based paint if you’re working with metal.
2. Use painter’s tape to create clean lines and avoid over-spray. Cover any areas that you don’t want painted with tape before you start spraying.
3. Practice on a scrap piece of cardboard or paper before beginning your project. This will help you get a feel for how much paint to use and how far away from the surface you need to hold the can.
Don’t go back over an area multiple times or else you risk creating uneven coverage or drips/runs in the paint job.
How to Smooth Out Spray Paint on Car
One way to get a smooth paint job on your car is to use spray paint. However, you need to be careful when using this type of paint because it can be difficult to control. Here are some tips on how to smooth out spray paint on your car:
1. Use a light coat of paint. When using spray paint, it is important to use a light coat so that you don’t end up with too much paint on your car. A thick coat of paint can be difficult to smooth out.
2. Use even strokes. When painting your car, make sure to use even strokes so that the paint is applied evenly across the surface. Uneven strokes can lead to an uneven finish.
3. Allow the first coat of paint to dry before applying additional coats. This will help prevent the new coats of paint from running or pooling in areas where the previous coat has not yet dried.
4 .
Be patient and take your time . Rushing through the painting process will only result in a less than perfect finish . So , take your time , and be patient !
How to Get a Smooth Finish With Spray Paint on Wood
Spray painting is a great way to get a smooth finish on wood surfaces. However, it’s important to follow some basic steps to ensure the best results. Here are four tips for getting a smooth finish with spray paint on wood:
1. Use a primer. A primer will help to create a smooth surface for the paint to adhere to. It will also help to prevent any bleed-through of the paint.
2. Use thin coats of paint. This will help to avoid any build-up of paint on the surface and will give you a smoother overall finish.
3. Use even strokes when painting.
Avoid start-and-stop strokes, as this can create an uneven finish. Instead, use long, even strokes in one direction.
4 .
Let each coat of paint dry completely before adding another layer . This will help prevent any runs or drips in the final product .
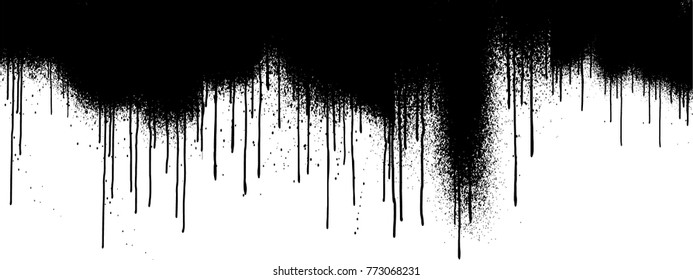
Spray Paint Drip Effect
Spray paint drip effect is a decorative painting technique used to create a three-dimensional look on a flat surface. It is achieved by applying thinned down paint to a surface and then tilting or turning the object so that the paint runs down in an irregular pattern.
This painting technique can be used on almost any type of surface, including wood, metal, glass, and even fabric.
It’s a great way to add some extra interest and depth to your décor. And best of all, it’s relatively easy to do!
Here’s what you’ll need to create a spray paint drip effect:
-Paint (acrylic or latex works best) -Thinner (for acrylic or latex paint) -Object to be painted -Painter’s tape -Newspaper or drop cloths -Cardboard box (optional)
Instructions:
1. Begin by taping off any areas you don’t want painted.
Use painter’s tape to protect floors, countertops, or furniture from accidental drips. If you’re working outdoors, consider covering nearby surfaces with newspaper or drop cloths.
2. Next, pour your desired amount of paint into a container and add thinner until the mixture is thin enough to run easily down your object when tilted.
The exact ratio will depend on the type of paint you’re using; consult your product label for guidance.
3. Once your paint is ready, place your object inside a cardboard box (this will help contain any messy drips). Then carefully tilt the box so that the paint runs down one side in an irregular pattern.
You can also turn the box completely upside down for a more dramatic effect!
How to Get a Glossy Finish With Spray Paint
One of the best ways to achieve a high-gloss finish with spray paint is to use a quality primer and paint. For most surfaces, you’ll want to use a white or light-colored primer so that the final color will be true to what you see on the can. Once you’ve applied the primer, let it dry completely before applying your topcoat.
When it comes time to select your paint, look for one that specifically says it’s designed for a high-gloss finish. These paints usually have a higher resin content, which will help create that shiny look you’re after. Again, make sure you follow the directions on the can and allow plenty of drying time between coats.
If you want an extra glossy finish, consider using a clear sealer over your painted surface. You can find these in aeros at most hardware stores; just be sure to read the labels carefully so that you choose one compatible with the type of paint you’re using. Apply the sealer according to directions, and enjoy your newly glossy surface!
Spray Painting Techniques
Spray painting is a versatile and convenient way to apply paint to surfaces. When done properly, spray painting can provide an even coat of paint with little to no brush marks. There are several different techniques that can be used when spray painting, and the best technique will depend on the project you are working on.
One of the most important things to keep in mind when spray painting is proper ventilation. You will want to make sure that you are working in a well-ventilated area, as fumes from the paint can be harmful. In addition, you will want to wear a mask to avoid inhaling any particles from the paint.
Another thing to consider is the type of paint you are using. Some paints are designed specifically for use with a sprayer, while others may need thinning before they can be used in this manner. Be sure to consult the instructions on your particular brand of paint before beginning your project.
Once you have all of your supplies gathered, you will need to prepare your surface for painting. This may involve sanding or priming, depending on the material you are working with and the look you are going for. Once your surface is ready, it’s time to start spraying!
There are a few different ways to hold the sprayer while spraying. The first is by holding it vertically, pointing straight down at the surface being painted. This method works well for small areas or projects where detailed work is not necessary.
The second way is called ‘overlapping’. To do this, hold the sprayer slightly tilted so that only part of the nozzle is making contact with the surface being painted – this allows you to cover more area quickly without missing any spots. Overlapping is especially useful when covering large areas such as walls or ceilings.
Finally, ‘feathering’ involves holding the nozzle very close to the surface and moving it back and forth rapidly – this creates a soft edge which can be helpful when trying to achieve a gradient effect or blend two colors together seamlessly . Try out each method and see what works best for you!
How to Get a Smooth Finish With Spray Paint on Metal
If you’re looking for a smooth finish with your spray paint job on metal, there are a few things you can do to make sure you get the best results possible. First, sand the surface of the metal lightly with fine-grit sandpaper. This will help create a smooth base for the paint to adhere to.
Next, wipe down the metal with a clean cloth to remove any dust or debris. Once the surface is prepped, it’s time to start painting! Use even strokes and be sure to keep the can moving while you spray so that you don’t end up with any drips or runs in the paint.
If necessary, apply a second coat of paint once the first one is dry. And that’s it! With just a little bit of preparation and care, you can achieve an amazing finish on your next spray painting project!
Credit: www.shutterstock.com
What Causes Runs When Spray Painting?
If you’re spraying paint and noticing runs, it’s likely due to one of a few different factors. First, the paint may be too thin. When paint is too thin, it doesn’t have enough body to resist the force of the spray nozzle, and can end up running down the surface you’re painting.
Second, your spray gun may be set too low. If the pressure is too low, again, the paint will lack the body needed to resist the force of the nozzle and will run. Third, you may be holding the gun too close to the surface.
The further away you hold it, the wider the spray pattern will be and less chance there is for runs. Finally, your environment could be playing a role – if it’s windy or very humid, that can cause runs in paint as well.
The best way to avoid runs when spray painting is to make sure your paint is properly mixed – not too thick or thin – and that your gun is set at an appropriate pressure.
Hold the gun about 12-18 inches from surfaces being painted, and try to avoid painting in extreme weather conditions if possible.
How Do I Get a Smooth Finish With Spray Paint?
There are a few key things you need to do in order to get a smooth finish with spray paint. First, make sure that your surface is clean and free of any dirt or debris. Next, sand down the surface to create an even texture.
Once the surface is prepped, start by applying a primer coat. This will help the paint to better adhere to the surface and also provide a more even coverage. Finally, once the primer is dry, apply your topcoat of paint using long, even strokes.
Allow the paint to dry completely before handling or using the item.
Is There a Way to Fix Spray Paint Drips?
If you’re looking to fix spray paint drips, there are a few things you can do. First, if the drip is still wet, you can try to blot it up with a paper towel. If the drip is dry, you can try to scrape it off with a razor blade.
If neither of those methods work, you can always sand the area down and repaint it.
How Do You Graffiti Without Drips?
There are a few different ways that you can graffiti without drips. One way is to use a smaller nozzle on your spray paint can. This will help to control the amount of paint that comes out and prevent drips.
Another way is to hold the can further away from the surface that you are painting. This will also help to control the amount of paint that comes out and prevent drips. Finally, you can try to slow down your painting strokes.
This will help to control the amount of paint that comes out and prevent drips.
How to Spray Paint a Tumbler Without Getting Drips
Conclusion
If you’re looking to avoid drips while spray painting, there are a few things you can do. First, make sure that your paint is the right consistency – not too thick or too thin. Second, hold the can about 10-12 inches away from the surface you’re painting and keep moving it as you go.
Finally, don’t overdo it – apply several light coats rather than one heavy coat. With these tips in mind, you should be able to get a smooth, even finish without any drips!