Acrylic paint is a versatile medium that can be used for a variety of purposes, including hydro dipping. Hydro dipping is a process in which an object is dipped into a vat of water and then coated with a layer of paint. This method can be used to create unique patterns and designs on objects.
- Begin by adding your acrylic paint to a bowl of water
- You will want to use a ratio of one part paint to three parts water
- Next, take your item that you will be hydro dipping and submerge it into the bowl of water
- Once your item is fully submerged, slowly lift it out of the water while holding it close to the surface of the water
- Doing this will help to prevent any air bubbles from being trapped under the paint
- Continue to hold your item close to the surface of the water as you move it over to your container of clear coat/sealer
- Submerge your item into the clear coat/sealer and then slowly lift it out
- Allow your item to dry completely before using or displaying it
Hydro Dipping Tumbler With Acrylic Paint
Hydro dipping is a process of applying paint to an object using water as the medium. The object is first dipped into a tank of water and then into a vat of paint. The paint adheres to the object and creates a design that can be customized according to the user’s preference.
Acrylic paints are commonly used for hydro dipping tumblers because they provide a smooth, consistent finish. These paints are also durable and resistant to fading, making them ideal for use on objects that will be exposed to sunlight or other sources of light.
How to Hydro Dip With Acrylic Paint Without Borax
Hydro dipping is a process where you can apply paint to an object without having to use a brush. This is done by submerging the object in water and then adding paint to the water. The paint will then adhere to the object and you can remove it from the water once it is dry.
To hydro dip with acrylic paint, you will need: -A container of water -Acrylic paint -Borax (optional)
1. Fill your container with water and add a few drops of acrylic paint. You can experiment with different colors and combinations to see what effects you can create.
2. If you are using borax, add it to the water now and stir until dissolved. This will help the paint adhere better to the object.
3. Submerge your object in the water and wait for it to become covered in paint.
Depending on how thick you want the coating, you may need to wait for the first layer to dry before adding more paint.
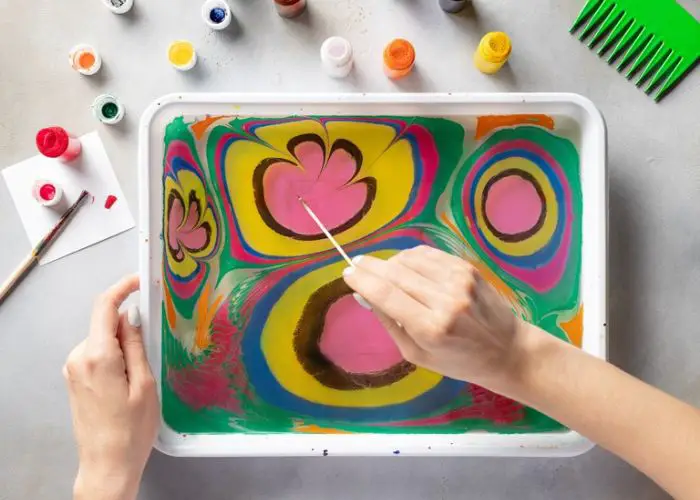
How to Marble Dip With Acrylic Paint
Have you ever wanted to try your hand at marble painting, but weren’t sure how to get started? Well, you’re in luck! In this blog post, we’ll show you how to marble dip with acrylic paint.
The supplies you’ll need for this project are:
-Acrylic paint in various colors (we used white, black, and teal)
-A cup of water
-A container big enough to fit your item(s) that you want to paint (we used an old tupperware)
now let’s get started! first things first – pour a little bit of each color of paint into the container.
Next, take the cup of water and slowly pour it into the center of the container. Be careful not to splash! Now comes the fun part – dip your item(s) into the mixture and watch as the colors start to swirl around.
Let it dry completely before displaying or using your new work of art!
How to Thin Acrylic Paint for Hydro Dipping
Acrylic paint is a versatile medium that can be used for a variety of projects. It can be thinned out with water to create a water-based paint, or it can be mixed with other ingredients to create an oil-based paint. When thinning out acrylic paint for hydro dipping, it’s important to use the right ratio of paint to water.
Too much water will make the paint too runny and difficult to control, while too little water will make the paint thick and hard to work with. The ideal ratio of acrylic paint to water for hydro dipping is 2 parts paint to 1 part water.
Start by mixing your acrylic paint and water in a bowl or container.
Once everything is combined, dip your object into the mixture. Make sure that the entire surface of the object is covered with the mixture. Allow the excess mixture to drip off before placing the object into the hydro dipped tank.
This step is important because it ensures that there isn’t too much liquid on the object, which can cause problems during the hydro dipping process.
Once your object is in the tank, wait for the liquid to dry completely before removing it from the tank. This usually takes about 24 hours.
Once dry, you’ll have a beautiful and unique finish on yourobject thanks to your thinner acrylic paint!
Hydro Dip With Nail Polish
If you’re looking for a fun and easy way to add some pizzazz to your nails, you should try hydro dipping with nail polish! It’s a simple process that anyone can do at home, and it produces stunning results. Here’s everything you need to know about how to hydro dip with nail polish.
What You’ll Need: -Nail polish in the colors of your choice -A container of water large enough to submerge your nails completely
-A piece of cardboard or paper towel -Tape (optional)
Acrylic Dip Painting
Acrylic dip painting is a fun and easy way to add color to your nails. The best part about it is that you can create any design you want! All you need is a few supplies and some creativity.
Here’s what you’ll need:
-A base coat of polish (this will help the color adhere to your nails better)
-Acrylic paint in the colors of your choice
-A small bowl or cup for each color paint
How to Hydro Dip Without Spray Paint
Hydro dipping is a great way to add some personality to your belongings without resorting to spray paint. It’s also relatively simple and doesn’t require any special equipment. All you need is a container of water, some hydro dip film, and an object to dip.
Here’s a step-by-step guide to hydro dipping without spray paint:
1. Fill your container with water and submerge the hydro dip film. Make sure the entire sheet is wet.
2. Place your object on top of the wet film and gently press down so that it makes full contact.
3. Lift the object straight up out of the water, taking care not to disturb the film too much. Allow excess water to drip off before moving on to the next step.
Hydro Dip With Paint
Hydro dipping with paint is a popular way to add color and design to objects. The process is simple and can be done at home with little equipment. All you need is a container of water, some paint, and an object to dip.
The first step is to prepare your paint. Mix it according to the instructions on the container. Then, fill your container with water and add the paint.
Stir it around until the color is evenly distributed.
Next, carefully place your object in the water. It should be completely submerged.
Let it sit for a few minutes so that the paint can adhere to it.
Finally, remove the object from the water and let it dry completely before handling or using it. This may take several hours or even days depending on the type of paint you used.
Credit: paintsacrylic.com
What Kind of Paint Can You Use for Hydro Dipping?
There are a few different types of paint that can be used for hydro dipping, but the most common and best type to use is water-based paint. This type of paint is easy to work with and doesn’t require any special equipment or chemicals to clean up. It also dries quickly, which is important when you’re working with wet surfaces.
What Can You Use Instead of Spray Paint for Hydro Dipping?
If you want to hydro dip without using spray paint, there are a few things you can do. You can use a water-based paint or dye, which will be less toxic and easier to clean up than traditional spray paint. You can also use an airbrush to apply the paint or dye to the object you’re dipping.
If you don’t have access to an airbrush, you can try using a sponge or brush to apply the paint or dye. Whichever method you choose, make sure you test it out on a scrap piece of material first so that you don’t ruin your project.
Does Acrylic Paint Float on Water?
If you’ve ever wondered if acrylic paint floats on water, the answer is yes! Acrylic paint is made of pigments suspended in a polymer emulsion, and because it is water-based, it will float on top of water. However, once the paint dries, it becomes insoluble in water and will no longer float.
So if you’re looking to create a floating work of art, make sure to do it before the paint dries!
How Do You Hydro Dip Rocks With Acrylic Paint?
Hydro dipping is a process of applying a design to an object using water. The object is first placed in a tank of water and then paint is applied to the surface. The paint adheres to the object and creates a design.
This process can be used to apply designs to rocks using acrylic paint. First, the rock is placed in a tank of water. Then, acrylic paint is applied to the surface of the rock.
The paint will adhere to the rock and create a design.
How to do Marbling basics acrylics on water 2 of 3
Conclusion
Yes, you can hydro dip with acrylic paint! Here’s how:
1. Prepare your surface.
Make sure it is clean and free of any dirt or debris.
2. Mix your paint. Acrylic paint is water-based, so you will need to add a little bit of water to thin it out.
3. Apply the paint to your surface. You can use a brush, roller, or sprayer to do this.
4. Allow the paint to dry completely before proceeding to the next step.
5. Dip your item into the water bath. This can be done using a simple bucket or container.