It’s easy to achieve the shiplap look with a little paint and some elbow grease. You don’t need any fancy equipment or painting skills, just a few supplies and a bit of time. Here’s how to paint shiplap with a roller:
Start by cleaning the surface you’ll be painting. This will ensure that the paint adheres properly and doesn’t come off in streaks or patches. Once the surface is clean, use painter’s tape to mask off any areas you don’t want painted, like baseboards or door frames.
Next, pour your paint into a tray and load up your roller. To get an even coat of paint, start in the middle of the wall and work your way outwards in both directions. Use long, even strokes and try not to go over the same area more than once or twice.
Once you’ve finished painting, remove the painter’s tape while the paint is still wet. This will help prevent peeling or chipping later on. Allow the paint to dry completely before putting anything back in place or using the room again.
- Begin by painting the top edge of the shiplap with a brush
- This will help ensure that you don’t miss any nooks and crannies
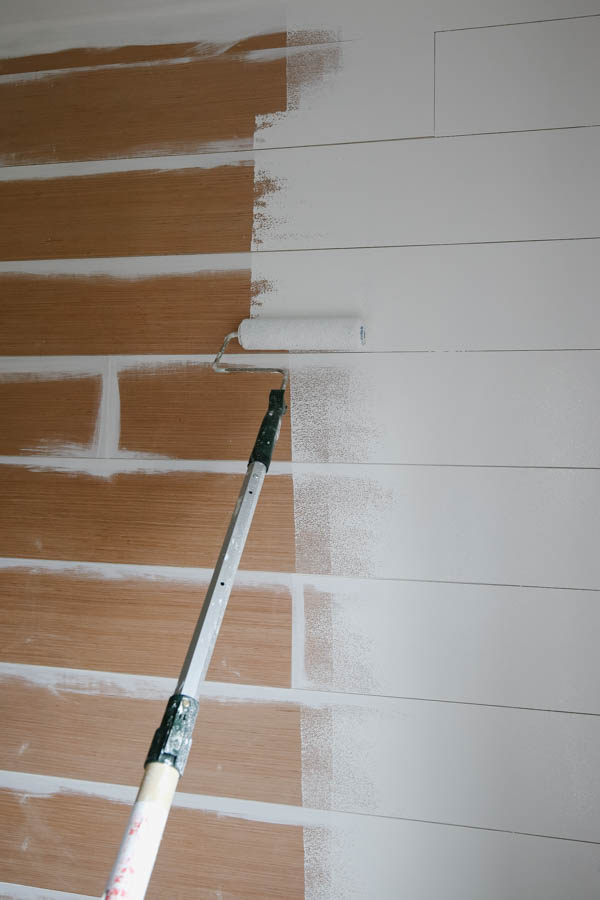
- Once the top edge is complete, use a roller to paint the rest of the shiplap
- Be sure to keep a wet edge to avoid creating lap marks
- After the first coat is complete, let it dry for at least two hours before applying a second coat
How to Paint Shiplap Grooves
Shiplap is a type of wooden board used for construction and decoration. The boards have a rabbet or groove cut into each edge, so they fit together snugly. Shiplap can be painted any color you like, but the most popular look is white.
To paint shiplap grooves, you will need:
-Paintbrush
-Paint roller
-Tape measure
-Pencil or chalk line
Assuming you want to paint your shiplap white, here are detailed instructions on how to do so:
1. Begin by measuring the width of the board and marking it with a pencil or chalk line. This will be your guide for painting the boards later on.
2. Next, use painter’s tape to create stripes that are about 2 inches wide.
Be sure to press the tape down firmly so that no paint bleeds through. You can also use a small foam roller to help apply even pressure.
3a.
To paint the top portion of each stripe, load your brush with paint and then tap it off onto a paper towel until there is only a small amount remaining on the bristles. This will help prevent drips as you work. Starting at one end of the stripe, brush the paint on in long strokes from left to right (or right to left).
Work quickly so that you don’t have too much time for the paint to start drying before you’ve finished covering the entire area.. When you reach the other end of the stripe, stop painting and lightly drag your brush alongthe edge ofthe next sectionof tape to create a clean line.. Repeat this process until allof thistop portionsof thestripeshave beenpainted.. Ifyou make amistakeand getpaintoutsideofthe lines,.simplyusethewetedgeofthepreviousstripe topullitoffbeforeitdries.,,, 3b.,Nowyouwillpaintbottomportionssamecoloryouusedforthetopmostportion,,howeverthiswillbedonebyrollingratherthanbrushingonpaint.,Startatoneendofthestripeandloadyourrollerwithpaint.,Rolloutpaintonstripemovingfromlefttoright(orrighttoleft)inanevenmanneruntilentireareahasbeencoveredwithcolor….Youmayneedtoreloadyourrollerwithpaintseveraltimesduringthisprocessinordertocoverlargeareaefficiently…Whenfinishedpaintingbottomsectionallowtopdrycompletelybeforemovingontothenextstep.
How to Paint Shiplap After Install
If you’re looking to add a touch of farmhouse charm to your home, painting shiplap is a great way to do it! Shiplap is a type of wood siding that’s often used in barns and other rustic settings. It’s easy to install and can be painted any color you like.
Here are some tips for painting shiplap: 1. Choose the right paint. If you’re going for a distressed look, use an eggshell or matte finish paint.
For a more polished look, use a semi-gloss or high-gloss paint. 2. Prepare the surface. Sand down the shiplap before painting to create a smooth surface.
Wipe away any dust with a damp cloth before starting to paint. 3. Use painter’s tape. Run painter’s tape along the edges of the shiplap where it meets the ceiling, floor, or other walls.
This will help ensure crisp lines and prevent paint from bleeding onto these surfaces. 4 . Paint in sections .
Start at the top and work your way down, painting one section at a time . Use long strokes and go with the grain of the wood . 5 .
Add texture . To create a distressed look , lightly sand your newly painted shiplap after it dries .
Best Roller for Painting Shiplap
There are several types of rollers available for painting shiplap, each with its own advantages and disadvantages. The most important factor to consider when choosing a roller is the paint finish you desire. For a smooth, even finish without brush strokes, choose a foam or microfiber roller.
Foam rollers are inexpensive and easy to use, but they can leave behind small bubbles in the paint film if not used properly. Microfiber rollers provide better coverage and a smoother finish, but they are more expensive and require more care when cleaning.
If you’re looking for a textured finish, try using a natural bristle brush or a roller with an irregular surface.
This will give your shiplap some character and visual interest. Just be sure to test the technique on a scrap piece of wood first so you don’t ruin your final project!
Paint Shiplap before Or After Installing
If you’re considering adding shiplap to your home, you might be wondering if you should paint it before or after installing. The answer really depends on personal preference and the overall look you’re going for.
If you want a more finished look, painting the shiplap before installing it is probably your best bet.
This way you can avoid any gaps or unfinished edges. Plus, painting beforehand means less work once the shiplap is in place.
However, some people prefer the rustic look of unpainted wood and choose to install the shiplap first and then paint it later.
This gives you more flexibility in terms of how much paint you want to use and what colors you use. You can also add a distressed finish if desired.
Ultimately, there is no right or wrong answer when it comes to painting shiplap before or after installation.
It’s all about what works best for your space and style preferences!
Painting Shiplap With Sprayer
If you’re considering painting shiplap, there are a few things you should know! For starters, shiplap is a type of siding that is often used in country-style homes. It consists of overlapping boards that create a textured look.
Painting shiplap can be a bit tricky, but with the right tools and techniques, it’s definitely doable.
This will ensure that the paint adheres well and doesn’t chip or peel over time. Another tip is to use a high-quality paintbrush or roller with synthetic bristles. These will help create a smooth finish.
If you’re planning on painting your shiplap yourself, one of the best ways to do so is with a paint sprayer. Paint sprayers make the job much easier and faster than using a brush or roller alone. Plus, they’ll give you nice even coverage without any streaks or brush marks.
Just be sure to follow the manufacturer’s instructions carefully when using one!
How to Paint Mdf Shiplap
If you’re like me, you love the look of shiplap but dread the idea of painting it. I have good news for you! Painting MDF shiplap is actually quite easy and doesn’t require any special skills or equipment.
Here’s what you need to know:
1. Start by sanding your MDF shiplap with a fine-grit sandpaper. This will help create a smooth surface for paint to adhere to.
2. Next, apply a primer designed for use on MDF surfaces. This will help ensure even coverage and prevent the paint from peeling or flaking off down the road.
3. Once the primer is dry, you’re ready to start painting!
Use a brush or roller designed for use with latex paint, and start applying the paint in long, even strokes. Work in small sections so that the paint doesn’t have time to dry before you’ve had a chance to spread it evenly over the surface.
4 .
If you’re using multiple colors, be sure to allow each coat of paint to dry completely before moving on to the next color. This will prevent any unwanted ‘bleeding’ between colors.
5 .
Finally, once all of the paint is dry, apply a clear sealer over top if desired (this step is optional).
How to Paint Shiplap Ceiling
If you’re looking to add a touch of farmhouse style to your home, one way to do it is by painting your shiplap ceiling. Shiplap is a type of wooden board that is often used in barns and other rustic buildings. It’s characterized by its wide plank size and groove detail.
To paint a shiplap ceiling, start by sanding down the boards so that they’re smooth. Then, apply a primer and paint of your choice. For best results, use a semi-gloss or high-gloss paint so that the shiplap will be easy to clean.
Once you’ve painted the shiplap, consider adding some finishing touches like beams or lighting fixtures. This will give your farmhouse ceiling even more character!
How to Paint Pine Shiplap
Pine shiplap is a beautiful way to add texture and interest to any room. Here are some tips on how to paint pine shiplap:
1. Start by sanding the surface of the pine shiplap.
This will help create a smooth surface for painting.
2. Next, apply a primer to the pine shiplap. This will help the paint adhere better and provide a more even coat of paint.
3. Once the primer is dry, you can start painting the pine shiplap with your desired color. Make sure to use a brush or roller specifically designed for painting wood surfaces.
Credit: angelamariemade.com
Can You Use a Paint Roller on Shiplap?
Yes, you can use a paint roller on shiplap! In fact, it’s a great way to get an even coat of paint on your walls. Here are a few tips to help you get the best results:
1. Use a high-quality paint roller. This will help ensure that the paint goes on evenly and doesn’t leave any streaks or marks.
2. Make sure the shiplap is clean before you start painting.
Any dirt or debris will show through the paint if it’s not removed beforehand.
3. Use painter’s tape to create clean lines around the edges of the shiplap. This will help you avoid getting paint where you don’t want it.
4.. Paint in long, even strokes for best results. Start at the top of the wall and work your way down.
Be sure to overlapping each stroke slightly so that you don’t miss any spots.
What Type of Roller Should I Use to Paint Shiplap?
If you’re painting shiplap, you’ll want to use a high-quality roller with a thick nap. This will help ensure that the paint goes on evenly and smoothly. A good rule of thumb is to choose a roller with a nap that is 1/2 inch to 3/4 inch thick.
Should I Roll Or Brush Shiplap?
There’s no right or wrong answer when it comes to whether you should roll or brush shiplap – it simply depends on your personal preference! If you’re looking for a more rustic look, then rolling the shiplap will give you that weathered appearance. On the other hand, if you want a cleaner look then brushing the shiplap will be your best bet.
Whichever route you choose, just make sure to evenly coat the surface so that there are no missed spots.
How Do You Paint Grooves in Shiplap?
If you want to add some extra character to your shiplap walls, painting grooves in the boards is a great way to do it! Here’s how:
1. Start by painter the shiplap boards with a base coat of paint in the color of your choice.
Let this dry completely.
2. Next, use a small paintbrush or a toothpick to apply paint in the desired groove pattern onto the boards. You can be as creative as you like here!
3. Once you’re happy with the design, let the paint dry completely before moving on to the next step.
4. Finally, use a piece of sandpaper to lightly distressed the edges of each board for a more finished look.
How to Paint Planked or Shiplap Walls
Conclusion
If you’re looking to add some shiplap to your home, you can do it yourself with a little paint and a roller. Here’s how:
1. Start by painting the wall a solid color.
This will be your base coat and will help the shiplap stand out.
2. Next, measure and mark where you want your shiplap boards to go. You can use a level to make sure they’re straight.
3. Once you have your lines marked, start painting the boards with your desired color of paint. A good rule of thumb is to use two coats of paint for durability.
4. Finally, once the paint is dry, install your boards by nailing them into the wall studs.
And that’s it!