One of the best ways to achieve a professional looking paint job is by using a high-quality brush and taking your time. However, even with the best brush and careful application, you may still find yourself with visible brush strokes in your trim work. Luckily, there are a few things you can do to minimize or eliminate those pesky brush marks.
- Start with a clean surface
- Paint the trim using smooth, even strokes
- Use a high-quality paintbrush for best results
- Wait for the first coat to dry completely before adding a second coat, if necessary
- Enjoy your newly painted trim!
Paint Additive to Eliminate Brush Marks
If you’re looking for a way to eliminate brush marks when painting, consider using a paint additive. There are several different types of additives available, each with its own advantages and disadvantages. Here’s a quick overview of some of the most popular options:
Pigment Dispersal Agents: These additives help to distribute pigment evenly throughout the paint, resulting in a smoother finish. However, they can also make the paint more difficult to apply.
Flow Improvers: As the name suggests, flow improvers help paint flow more smoothly from the brush, making it easier to apply and resulting in fewer brush marks.
However, they can also make the paint thinner and more prone to running or dripping.
Thickeners: Thickeners increase the viscosity of paint, making it thicker and less likely to run or drip. They also make it easier to control the amount of paint being applied, which can result in fewer brush marks.
However, thickened paint can be more difficult to work with and may require additional time and effort to achieve a smooth finish.
Painting Doors And Trim Without Brush Marks
Whether you’re painting the inside or outside of your home, getting a clean, professional finish on your doors and trim can make all the difference in the overall look of your space. But if you’re not careful, brush marks can ruin an otherwise perfect paint job.
So what’s the best way to avoid those pesky brush marks?
Here are a few tips:
1. Use a high-quality brush. Cheap brushes will almost always leave behind brush strokes.
Spend a little extra money on a good-quality brush and you’ll be much happier with the results.
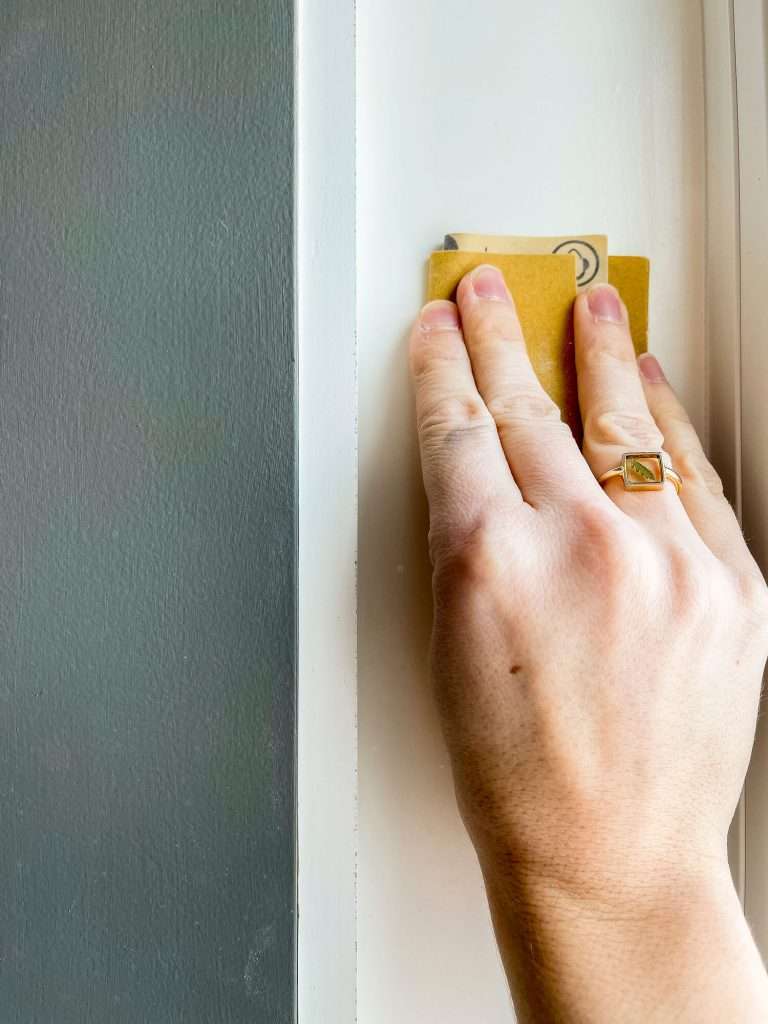
2. Prep properly. Make sure you sand down any rough spots on your door or trim before painting.
This will help create a smooth surface for your paint to adhere to and will also help reduce the appearance of brushstrokes.
3. Paint in one direction only. When you’re applying paint to door or trim, always paint in one direction only – never back and forth like you would with walls .
This will again help reduce the appearance of brushstrokes.
How to Fix Brush Marks in Paint
Brush marks in paint can be a real pain to deal with. But don’t worry, there are a few simple things you can do to fix them!
First, start by sanding the area with brush marks.This will help to smooth out the surface and make it easier for the paint to adhere. Next, apply a primer specifically designed for hiding brush marks. This will create a smooth base for your paint to go on.
Finally, use a high-quality paintbrush when painting. This will help to avoid any brush marks from happening in the first place!
Painting Trim With Roller Vs Brush
When it comes to painting trim, there are two main methods that people use – roller or brush. So, which one is the best? Here’s a look at the pros and cons of each method to help you decide which one is right for your project:
Roller Pros:
– Faster than brushing
– Less messy than brushing
– Can cover large areas quickly
Roller Cons:
– Can be more difficult to get into tight spaces and corners with a roller
How to Get Rid of Brush Strokes on Walls
If your walls have brush strokes that you want to get rid of, there are a few things you can do. First, try sanding the area with fine-grit sandpaper. If that doesn’t work, you can try using a primer designed for hiding imperfections.
Finally, if all else fails, you can always repaint the entire wall.
How to Avoid Brush Marks in Water Based Paint
Are you working with water based paint and want to avoid brush marks? Here are a few tips to help you out!
1. Use a high quality brush – This is really important, because if you use a cheap brush, the bristles will likely leave behind brush marks.
Spend a little extra on a good brush and it will make all the difference.
2. Load your brush properly – When you dip your brush into the paint, be sure to load it up evenly. This will help ensure that the paint is applied evenly to the surface and that there aren’t any heavy or light areas that will show up as brush marks.
3. Use long strokes – Once you’ve got your paintbrush loaded, use long strokes when applying the paint to your surface. Again, this will help ensure an even coat without any visible brush marks.
4. Don’t overwork the paint – If you start to see somebrush marks beginning to form, resist the urge to keep painting over them in an attempt to fix them.
This will only make things worse and can result in an uneven finish overall.
How to Remove Brush Marks from Paint
Are you working on a painting project and notice some unsightly brush marks? Never fear! There are a few simple ways that you can remove them and get your paint job looking flawless.
One way to remove brush marks is by lightly sanding the area with fine-grit sandpaper. This will smooth out the surface and help to blend in the brushstrokes. Just be sure not to sand too much, or you could end up taking off more paint than you intended!
Another option is to use a paint thinner or alcohol-based cleaner to remove the brush marks. Simply apply some of the liquid to a clean cloth and rub it over the area until the marks disappear. This method works best on oil-based paints.
If all else fails, you can always cover up the brush marks with another layer of paint. Sometimes starting over is the best way to achieve a perfect finish!
How to Remove Brush Strokes from Painted Furniture
If you’re looking to remove brush strokes from your painted furniture, there are a few things you can do. First, if the paint is still wet, you can try using a damp cloth to lightly dab at the area with the brush strokes. This may take some trial and error to get the perfect amount of moisture on the cloth, but it’s worth a shot.
If the paint is already dry, you can try sanding down the area with the brush strokes. Start with a fine-grit sandpaper and work your way up to a coarser one if necessary. Just be sure not to sand too much or you’ll end up removing more paint than just the brush strokes!
Once you’ve either dabbed or sanded away the brushstrokes, repaint the area with smooth, even strokes. If all else fails, you can always prime and repaint the entire piece of furniture – sometimes starting from scratch is the best way to achieve a flawless finish.
Credit: graceinmyspace.com
How Do I Stop Trim Brush Marks When Painting?
If you’re seeing brush marks in your paint job, there are a few things you can do to correct the problem. First, take a look at your painting technique. Are you using too much pressure when you brush?
Are you going back and forth over the same area too many times? Try lightening up your pressure and making fewer passes over the area.
Another thing to check is the type of brush you’re using.
If the bristles are too stiff, they can leave marks in the paint. Try switching to a softer bristle brush or even a foam brush. Finally, make sure you’re using an appropriate amount of paint on your brush.
Too much paint will make it difficult to control and can also lead tobrush marks.
With these tips in mind, you should be able to eliminate those pesky brush marks and enjoy a beautiful, smooth paint job!
How Do I Get a Smooth Finish on My Trim?
When it comes to painting trim, there are a few different ways that you can achieve a smooth finish. One popular method is to use a paintbrush with synthetic bristles. This type of brush will help to evenly distribute the paint and create a smooth finish.
Another option is to use a foam roller. Foam rollers are great for getting into tight spaces and corners and can also help to create a smooth finish. Whichever method you choose, be sure to take your time and work slowly in order to get the best results.
How Do You Paint Trim Without Leaving Lines?
If you’re painting trim and want to avoid leaving lines, there are a few things you can do. First, use a paintbrush with soft bristles. Second, load the brush with paint and then tap it against the side of the can to remove any excess.
Finally, when you’re ready to start painting, use long strokes in a single direction. following these tips should help you avoid leaving lines when painting trim.
What is the Trick to Painting Trim?
One of the most important aspects of a successful paint job is good prep work. This means taking the time to repair any cracks or dents in the trim before painting. Once the trim is smooth, you’ll want to use a high-quality primer before painting.
For best results, use a brush designed specifically for painting trim.
If you’re using latex paint, be sure to use a latex-based primer. For oil-based paint, use an oil-based primer.
Applying two coats of paint will also give you better coverage and durability. When applying the second coat of paint, wait until the first coat is completely dry before beginning.
Eliminating "Roping" Brush Marks When Painting
Conclusion
Are you considering painting your trim, but dreading the inevitable brush marks? Have no fear! Here are a few tips to help you avoid those pesky brush strokes and achieve a professional looking paint job.
1. Use a high quality brush. This may seem like an obvious tip, but using a good quality brush will make all the difference. A higher end brush will have better bristles that will result in a smoother application of paint.
2. Prepare your surface. Make sure to sand down any rough edges on your trim before painting. This will help create a smooth surface for the paint to adhere to and will also help reduce the appearance of brush strokes.
3. Use thin coats of paint. Applying several thin coats of paint is always better than trying to cover everything in one thick coat. Thin coats will dry more evenly and are less likely to show any imperfections, such as brush strokes.
4 . Let the paint dry completely between coats . Rushing through your project by not allowing adequate drying time can cause all sorts of problems, including premature cracking, bubbling, or peeling .
Plus , it’ll just look sloppy !
5 . Don ’ t forget about primer !
Primer provides extra insurance against visible flaws , so be sure to use it ( especially if you ’ re painting over a dark color with a light one ).
By following these simple tips , you can avoid those pesky brush marks and achieve a professional looking finish on your next trim painting project !